Setup For ENIGMA2 Device Using Putty.
1. This is instruction For Enigma 2/ Linux installation, you need install putty to use it.
Settings > Setup > System Network Device > Setup Adapter > Settings
And get your IP address it starts with 185.86.151….
2. Go to your windows PC and Download Putty Software.
3. Open Putty
4. Add your IP address of your Device.
5. Add Port 23
6. Click on open
7. Your default login and password are root
8. Copy your line ( you will get it after you order your subscription )
wget -O /etc/enigma2/iptv.sh “your m3u link” && chmod 777 /etc/enigma2/iptv.sh && /etc/enigma2/iptv.sh
9. RIGHT CLICK MOUSE BUTTON after you enter your line press ENTER
10. Type reboot and your device will restart.
Setup For ENIGMA2 Using XTREAM CODES PLUGGIN
1-Download the IPK package file for the Jedi Xtream Playlist Maker from here.
Note: If your box requires .Deb installation package file, you can download it here.

2-Connect to your Enigma 2 box using an FTP program like Filezilla or WinSCP and browse to /tmp/ folder at the root of your box. It basically means on the left side of the FTP software which is your box listing, click on tmp folder and that's all. We need to transfer the downloaded .IPK/.DEB file into the box manually for installation. Therefore, it needs to be FTPed there. If you are not familiar with this process, read this tutorial on "How to use SSH Terminal for IPTV and Cardsharing purposes". The only difference would be the software which is going to be Filezilla or WinSCP.
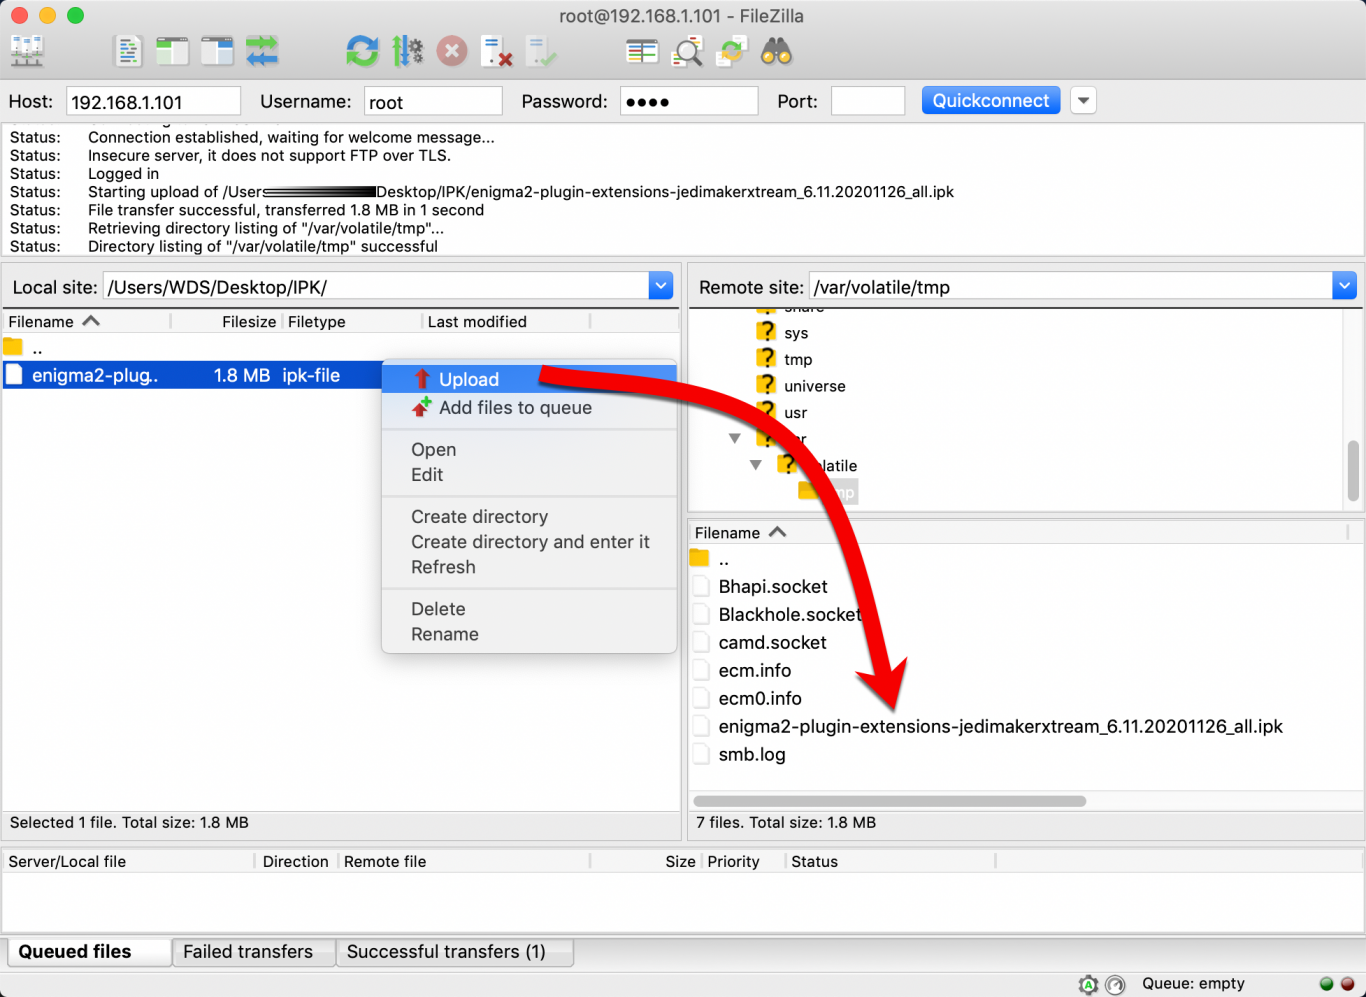
3-Transfer the file to the /tmp/ folder of your box.

4-On an empty screen click on the proper colored button on your remote to bring up Plugin Panel. The image we are using as mentioned above is a BlackHole image in which the green button brings up Plugin Panel which is called Black Hole Green Panel. On other images this function might be assigned to another colored button so proceed accordingly.
Click on the Yellow Button to bring up Addons.
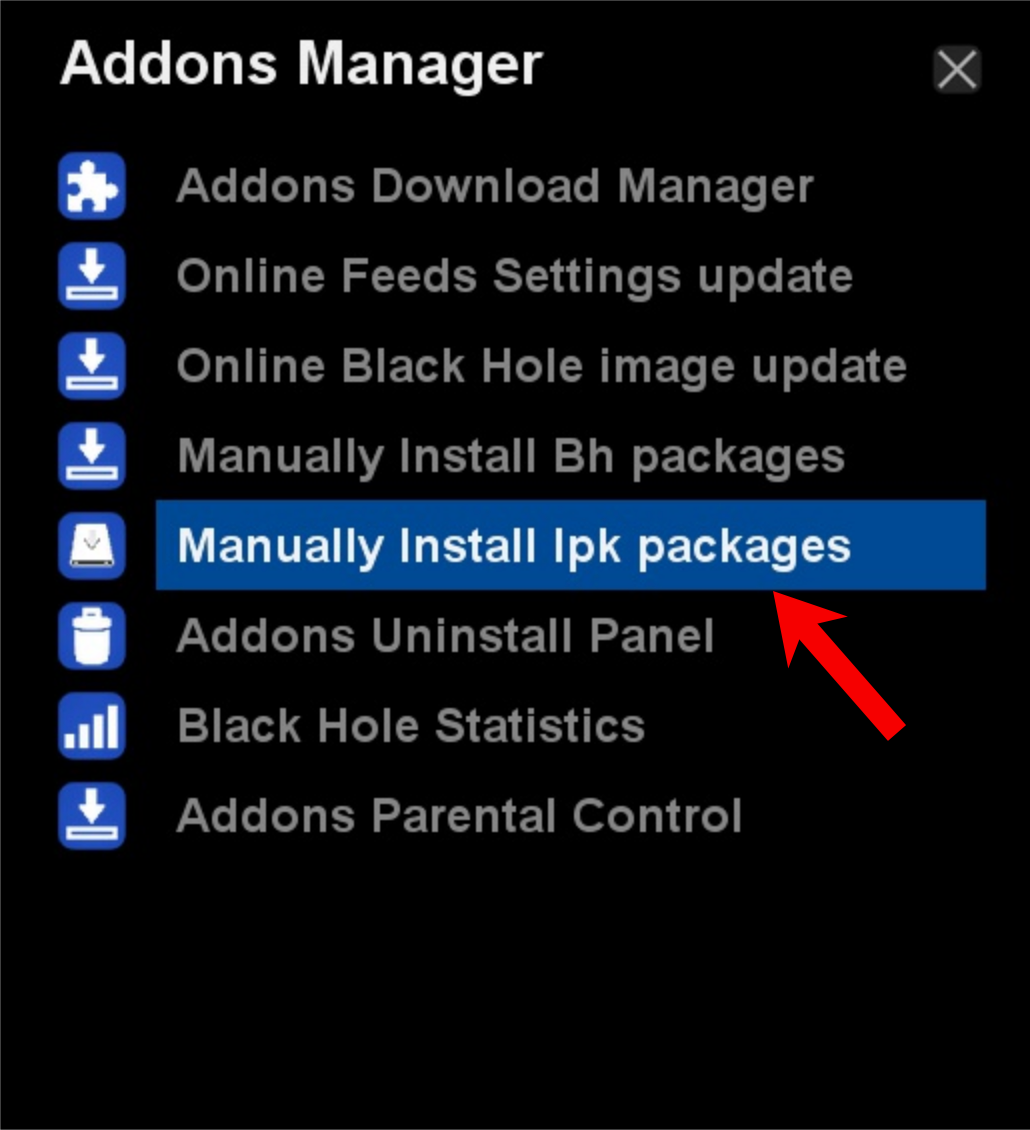
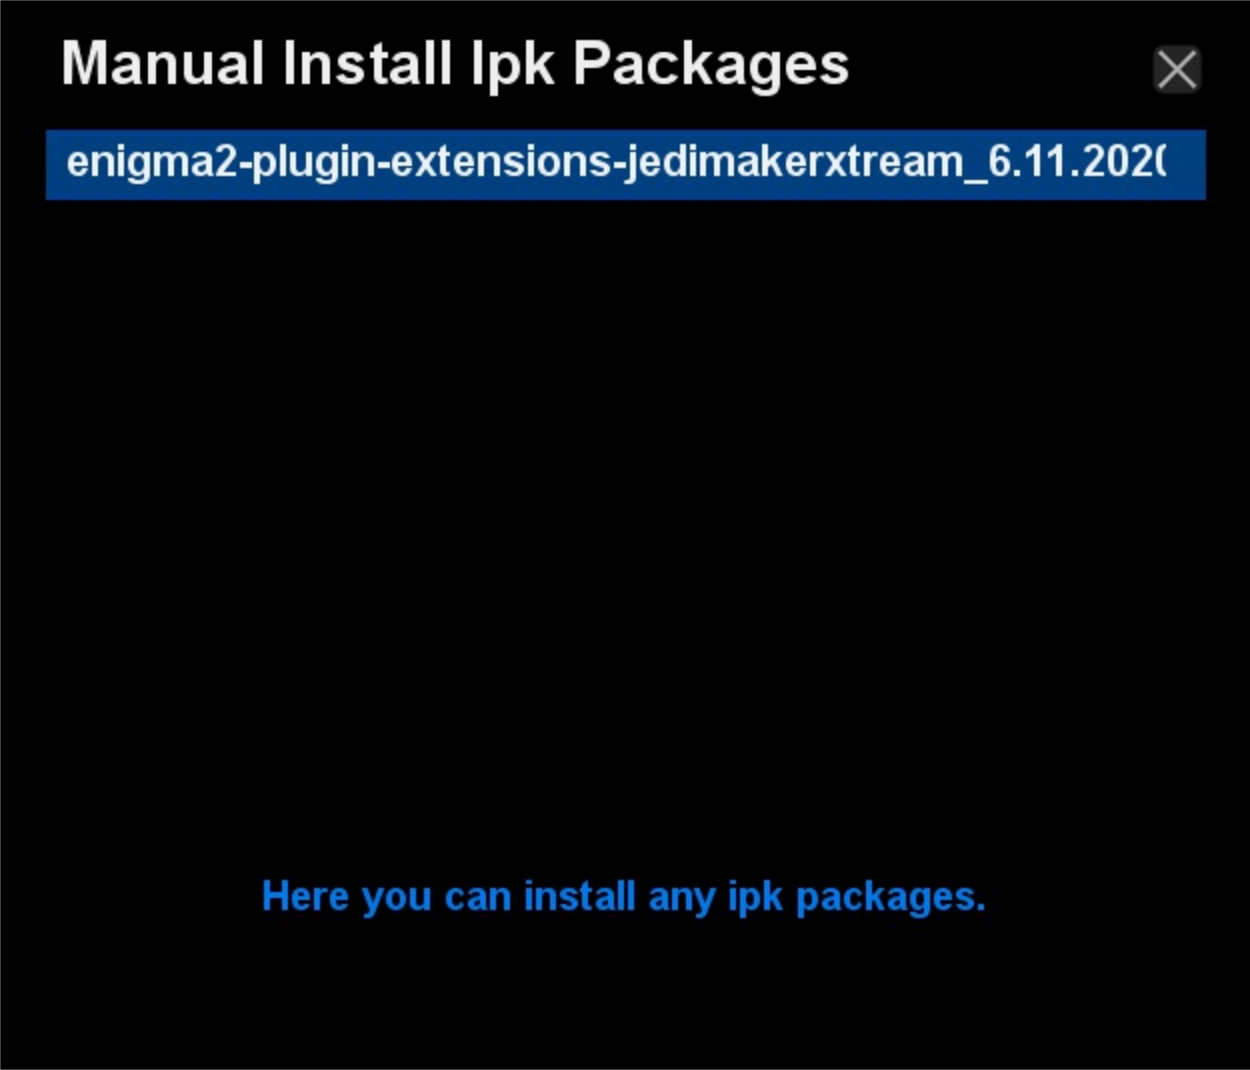
5-Click Manually Install IPK Packages. It automatically searches the /tmp/ folder for any available .IPK packages. We did put one there so we expect the box to catch that.
6-Good one! now click on the Enter/OK button on the remote to proceed with installation.
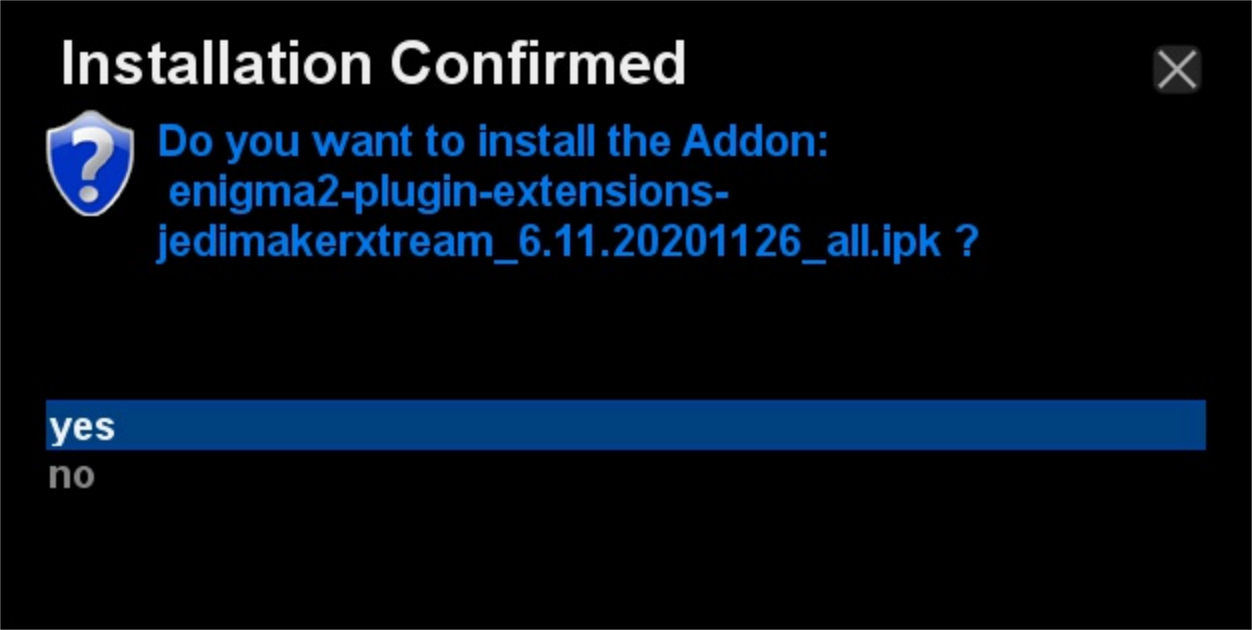
7-YES, please.
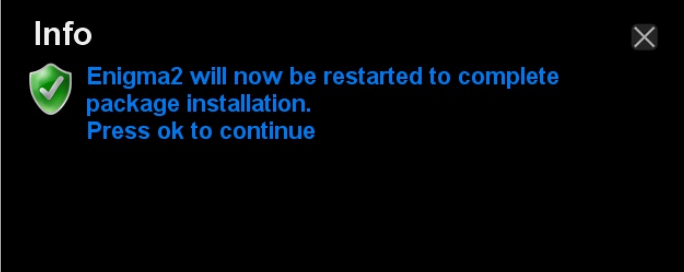
8-After a successful installation this message is expected. Click OK button and be patient until your box reboots itself.
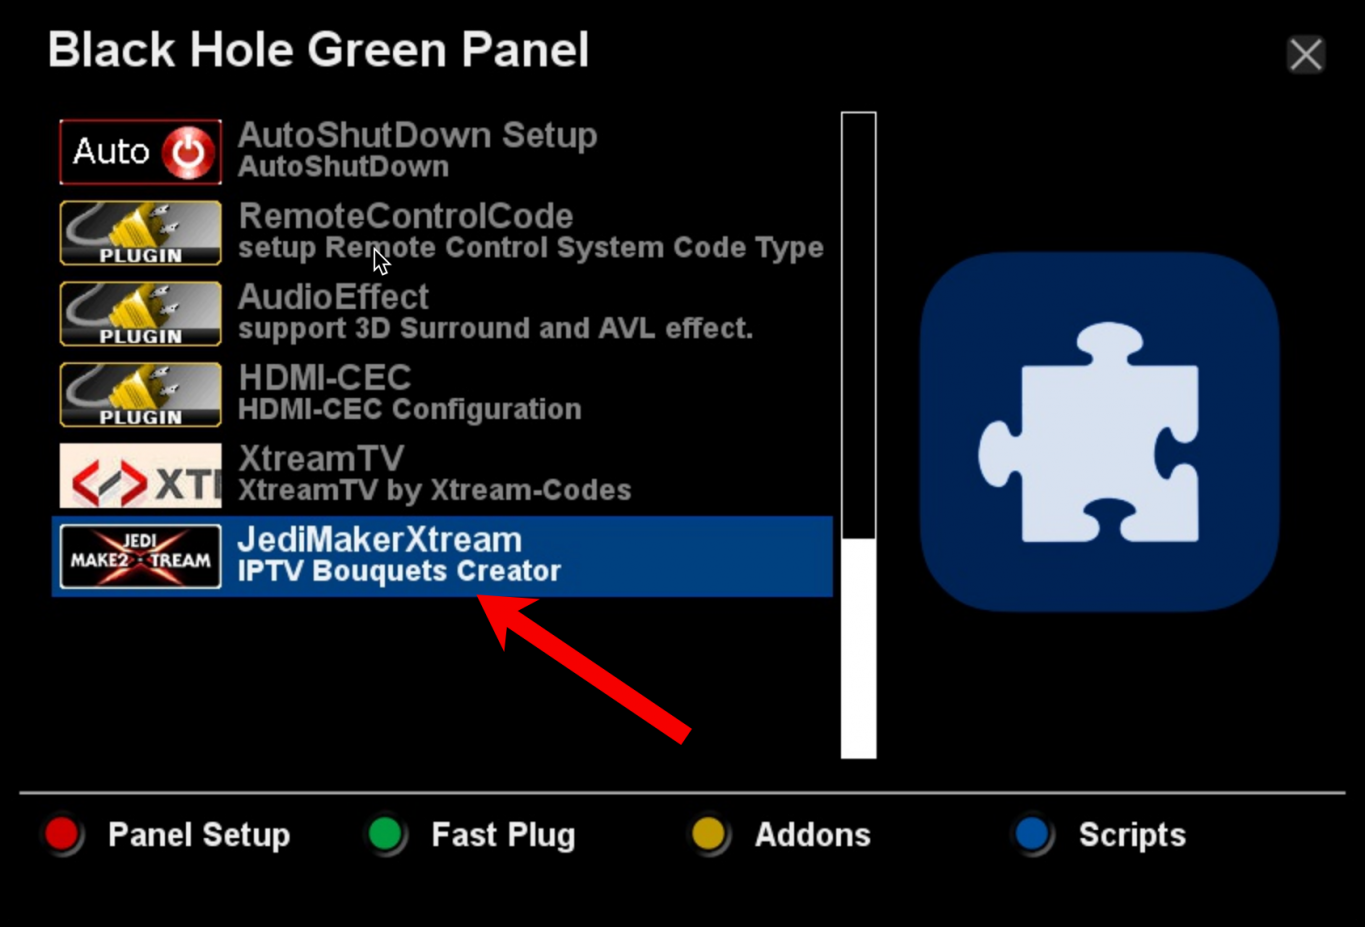
9-Once box is back up, click on the same colored button to bring up plugin panel again. Scroll down the page and Jedi Xtream Bouquet Maker should be there.
10-Beautiful! The plugin has been installed manually.
Now it's time to install IPTV on the plugin. A M3U streaming line is needed for this procedure. Also make sure that your provider categorizes channels so when you load the service on this plugin, all channels are categorized.
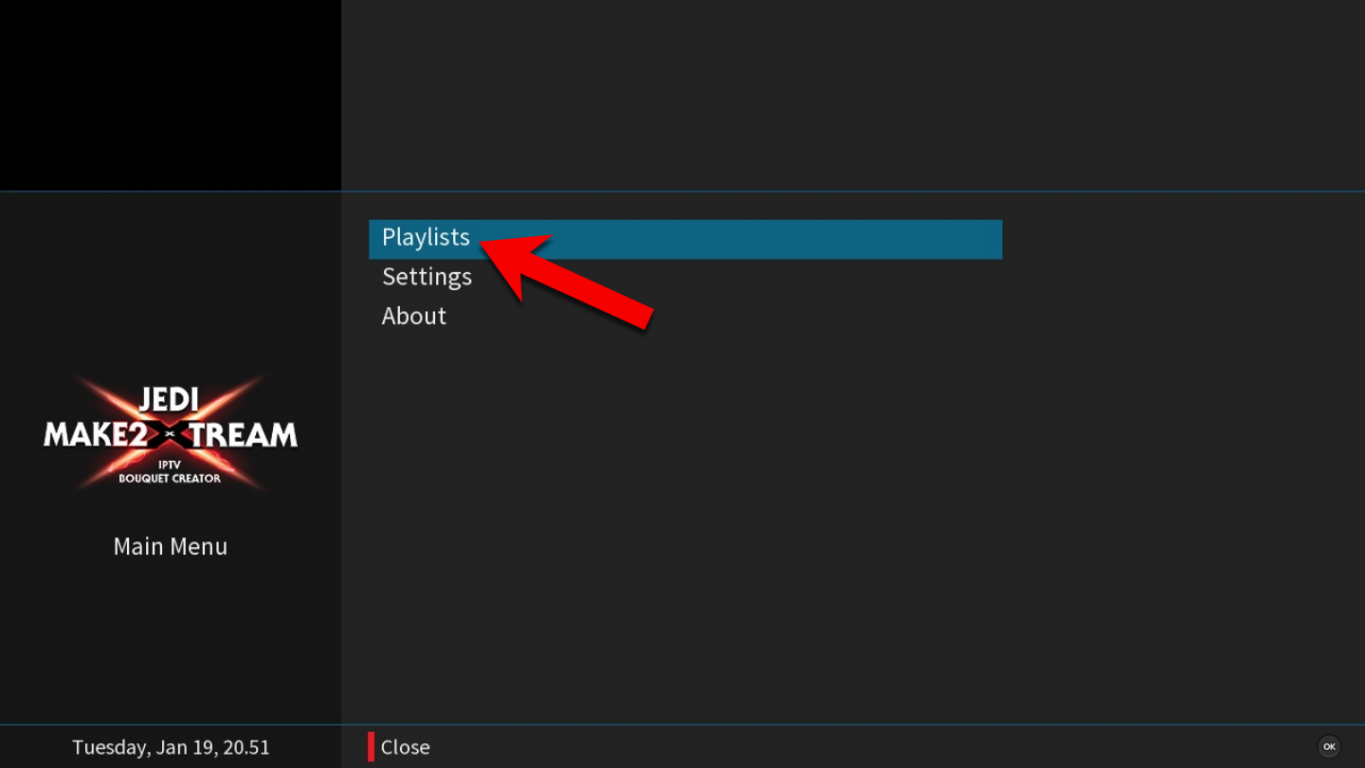
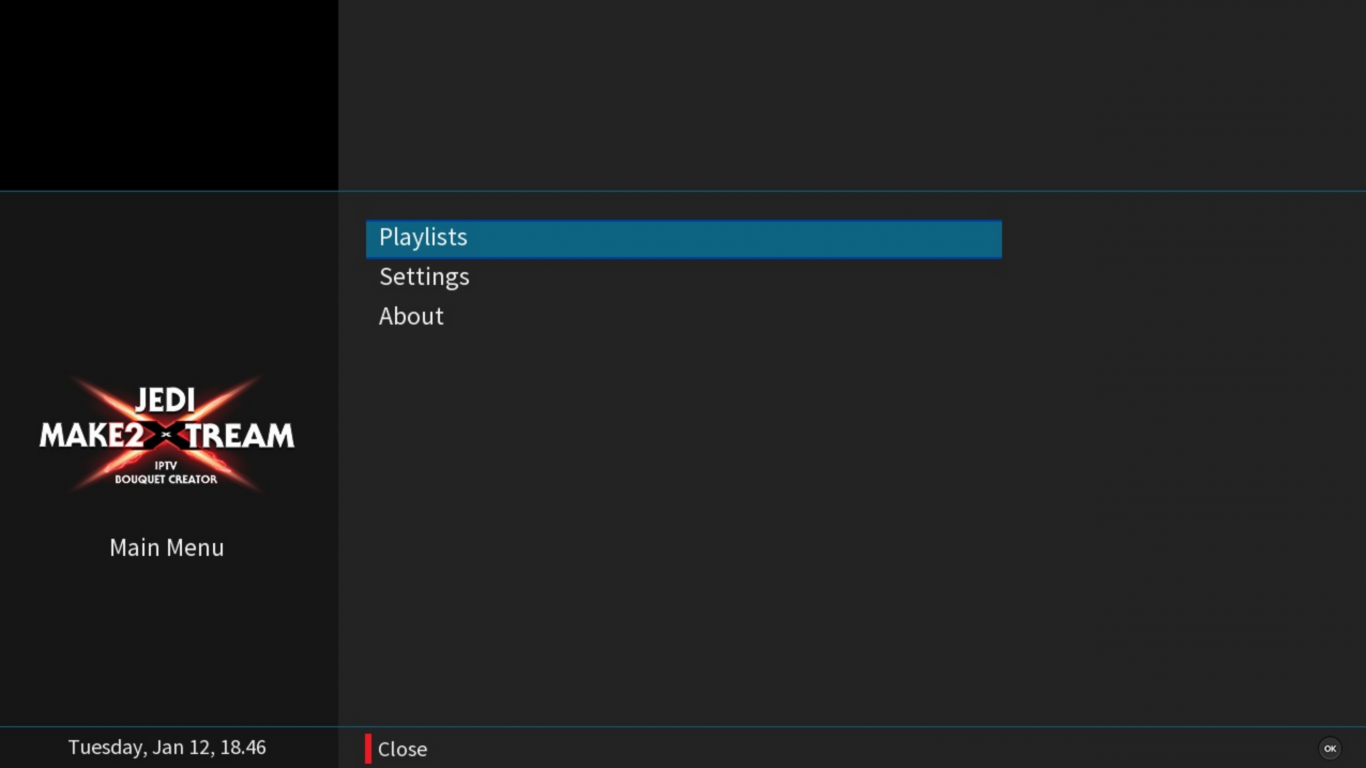
1-Open up the plugin and click on Playlists.
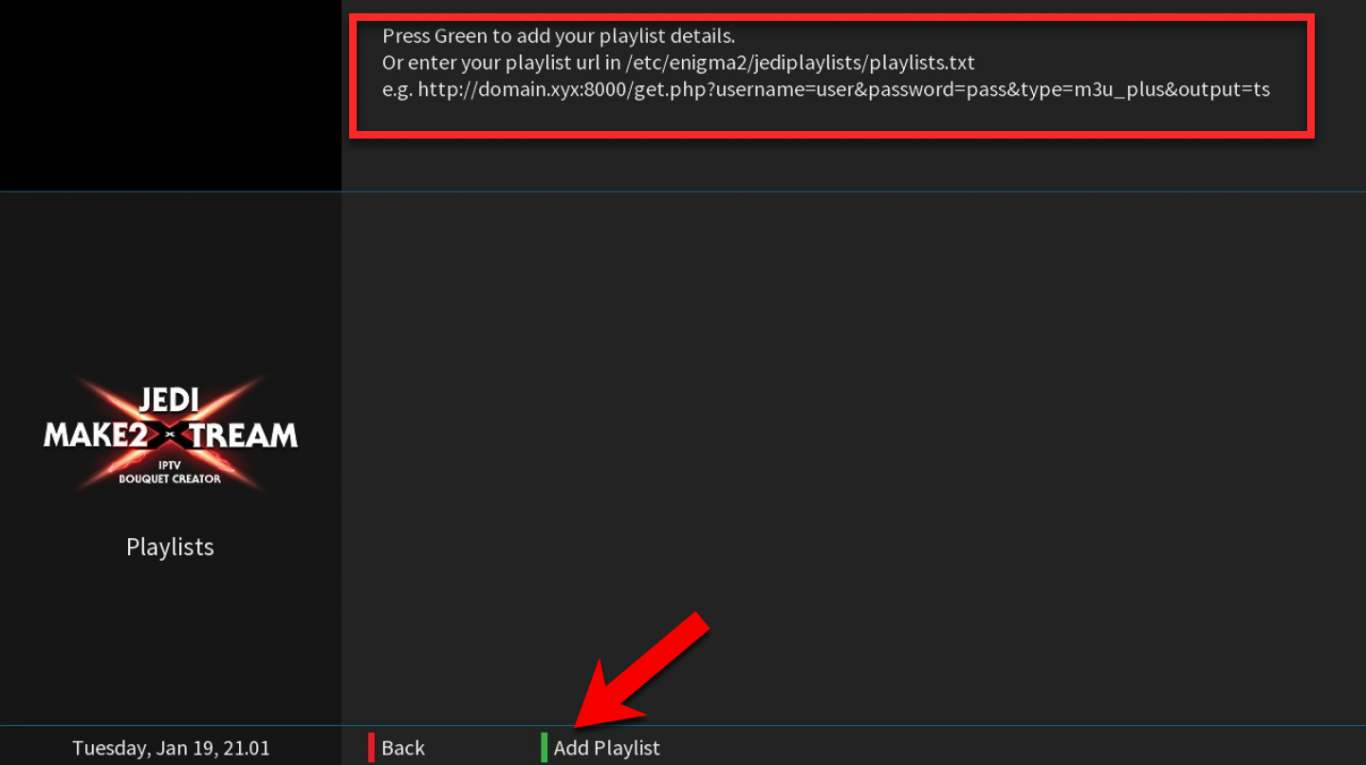
2-So as it is clear on this screen, by clicking on the Green button on the remote, we can add the playlist.
Another point to attend to is the sample M3U URL shown above (which is just an example and can not be used as an IPTV feed). It has a certain format which is called "m3u_plus". It is also called "M3U With Options". You can determine that by a close look at the value after "type=". This type of streaming line is the one by which you can get the categorized channel listing when you try to put the whole m3u. So make sure you ask your IPTV Provider for "m3u_plus"/"M3U with options" if you want to type the whole m3u URL on any app.
But, when an app supports Xtream Codes API, it is enough that the provider supports categorized channel listing and then you simply can set up IPTV and it will pull channels and store them in categories just as your provider has listed them.
In this installation, we will take the sample m3u URL as the one below:
http://xyzmedia.xyz:8880/get.php?username=username&password=password&type=m3u_plus&output=ts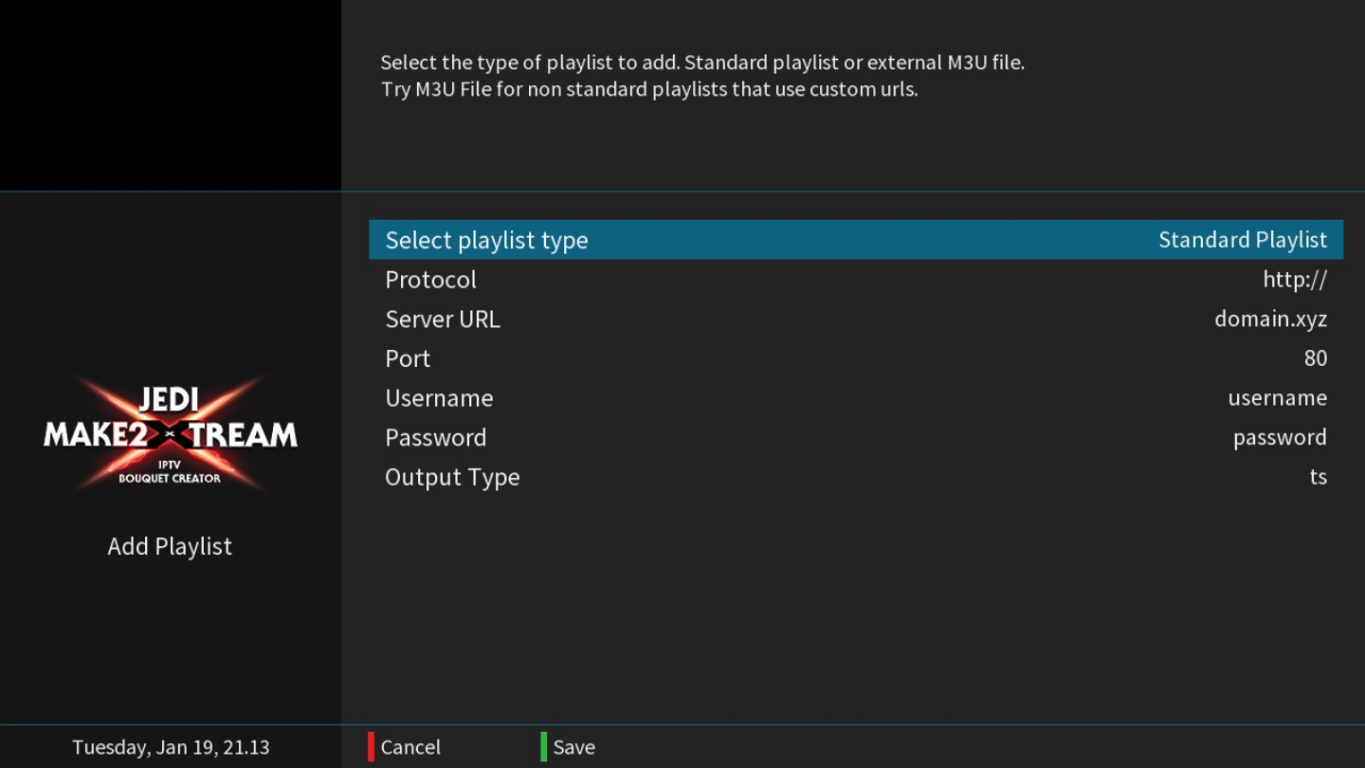
3-The installation is very easy:
Select Playlist Type: there are two choices: 1-Standard Playlist: which allows us to enter M3U details separately without typing the whole url 2-M3U File: which needs the whole m3u URL to be typed. So the first method is advised.
Protocol: 99 per cent of IPTV providers out there run their domains on bare HTTP:// so you can leave it on the default choice as http://. Ask your IPTV provider and if they are running their streaming service on SSL, you need to change this to HTTPS://
Server URL: in the M3U URL, after the value HTTP:// and before the value:port (look at the sample m3u URL above) would be the server address
Port: Usually comes after the server address with: before it. If you do not see: port value on your m3u URL, it means the port is 80. Ask your IPTV provider and if they are running their streaming service on SSL, you need to change this to 443 unless advised otherwise by the provider.
Username: is the value after "username=" on your m3u URL
Password: is the value after "password=" on your m3u URL
Output Type: There are two: 1-ts: Which is MPEGTS and that is the most common way of running a streaming line on IPTV devices/apps 2-m3u8: Which is HLS. If you wanna know the full details of streaming lines outputs, read this article.
Once all details are inputted, press the Green button on the remote to have it saved.
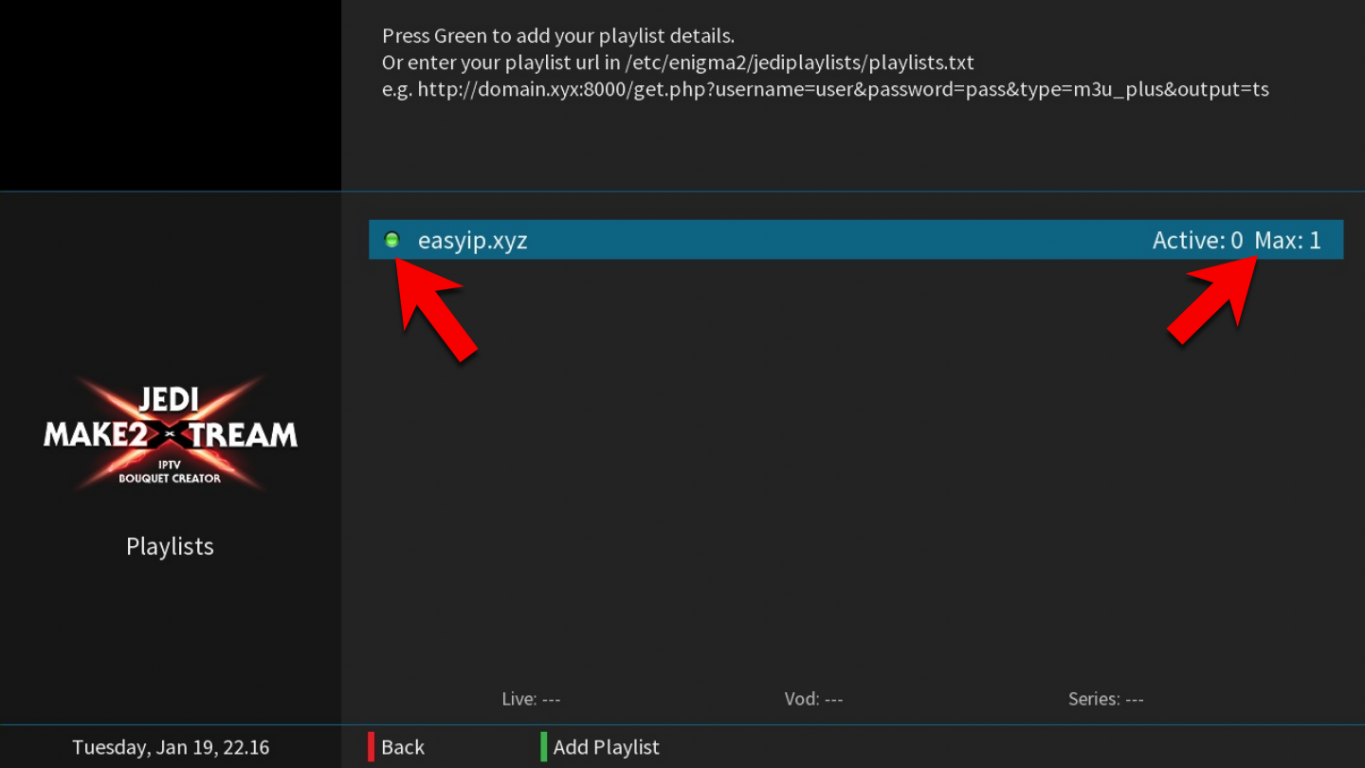
4-Playlist is imported. The green light on the left side shows that the inputted credentials in the previous step have been accepted by the remote server. Max stands for the maximum amount of concurrent connection allowed on your IPTV account by the provider which is not Active yet shown by 0 as we have not started to watch anything yet.
Now click the OK button on the remote so the plugin starts pulling data.
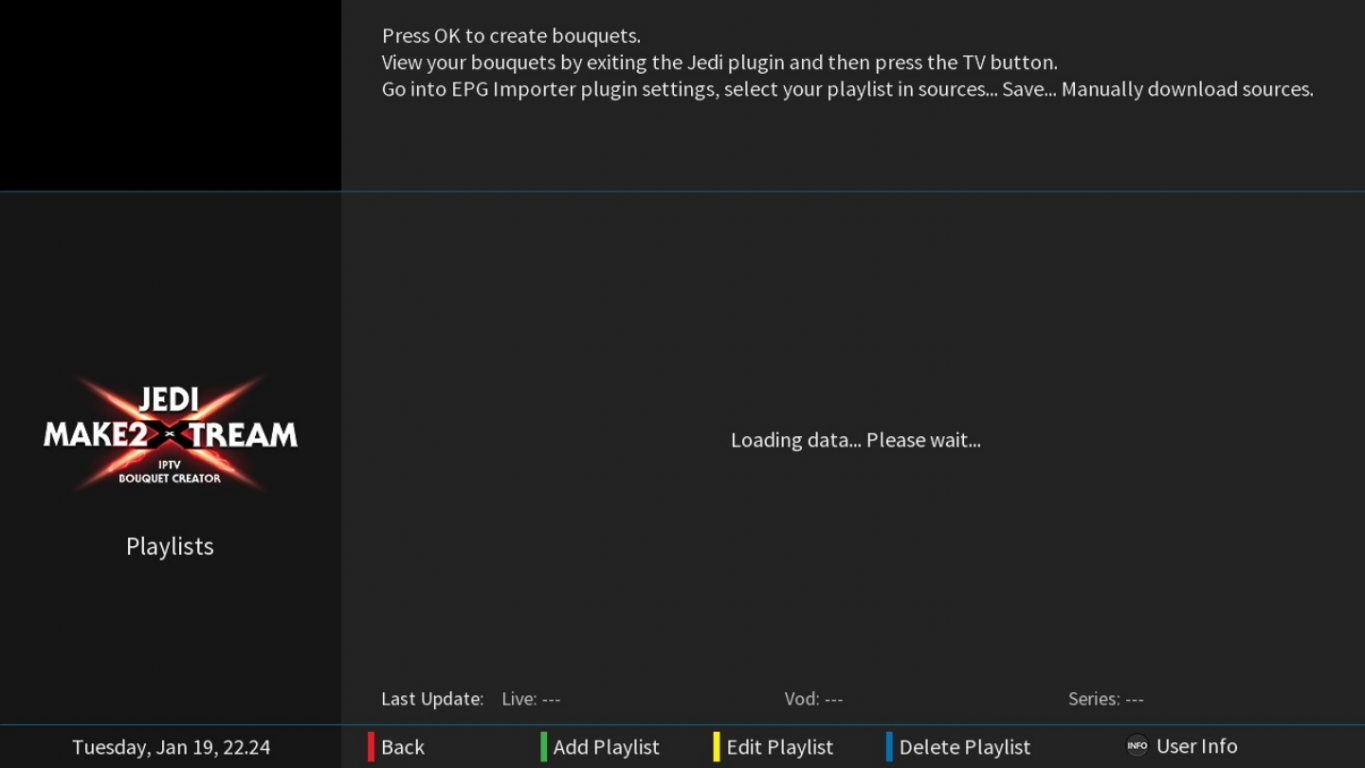
5-Let it pull and do not touch anything.
6-If all goes well, you will then get to this step where you can customize the bouquet.
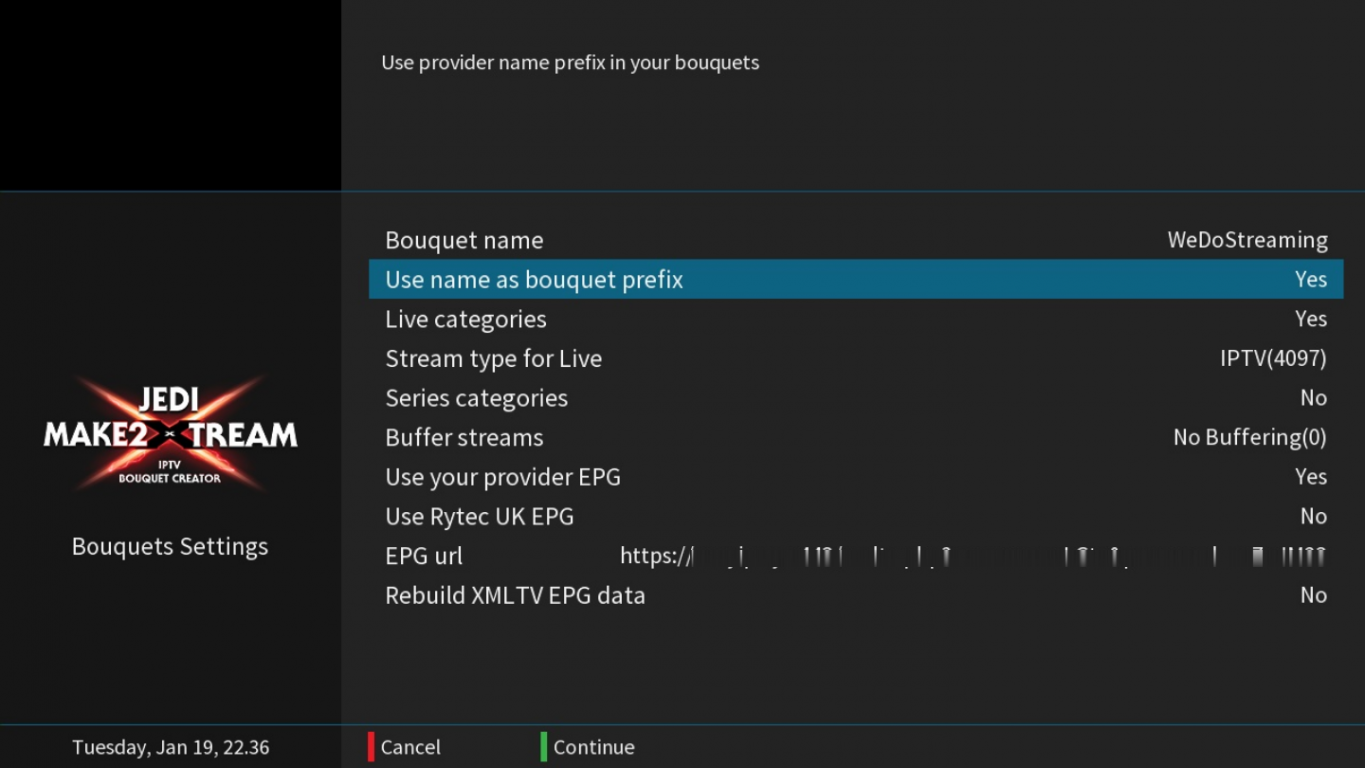
Bouquet Name: can be your desired name
Use name as bouquet prefix: adds your chosen bouquet name in the above step as a prefix to your categories.
Live categories: Leave this on YES to have LiveTV streams added to your bouquet
Stream type for Live: includes two player engines: 1-IPTV(4097): which is OE20 and that is the most common player engine for Enigma 2 boxes, you need to leave it on this option and see whether your IPTV streams run 2-DVB(1): is OE16 which is useful when your IPTV provider runs their streaming service on SSL. Long story short, if your streams do not play, change this and then retry.
Buffer streams: Leave it on No Buffering but if you notice bad buffering on your streams, try setting it Buffering Enabled(1) and if still no good, then change to Progressive Buffering(3). This option only works if you use stream type as IPTV(4097). Remember, before changing this, run diagnostics on your IPTV streams first by checking your internet connection and then consulting with your IPTV provider to make sure they have no issues on their side.
Use your provider EPG: leave it on YES if you are sure that your provider does have a built-in EPG system. You can verify this by asking them, or making an epg URL out of your m3u URL using this guide and then run it on your browser. If you see some nonsense metadata then it works. The plugin does create the right EPG URL for you and assign it if you check the EPG URL section.
Use Rytec UK EPG: this is another external EPG source if you are interested.
EPG URL: is what has been explained above, the derivative of the m3u URL which we inputted above.
Rebuilt XMLTV EPG data: do not use it unless you are certain that your EPG data is corrupted.
Once all set, click the Green button on the remote to save the settings and proceed.
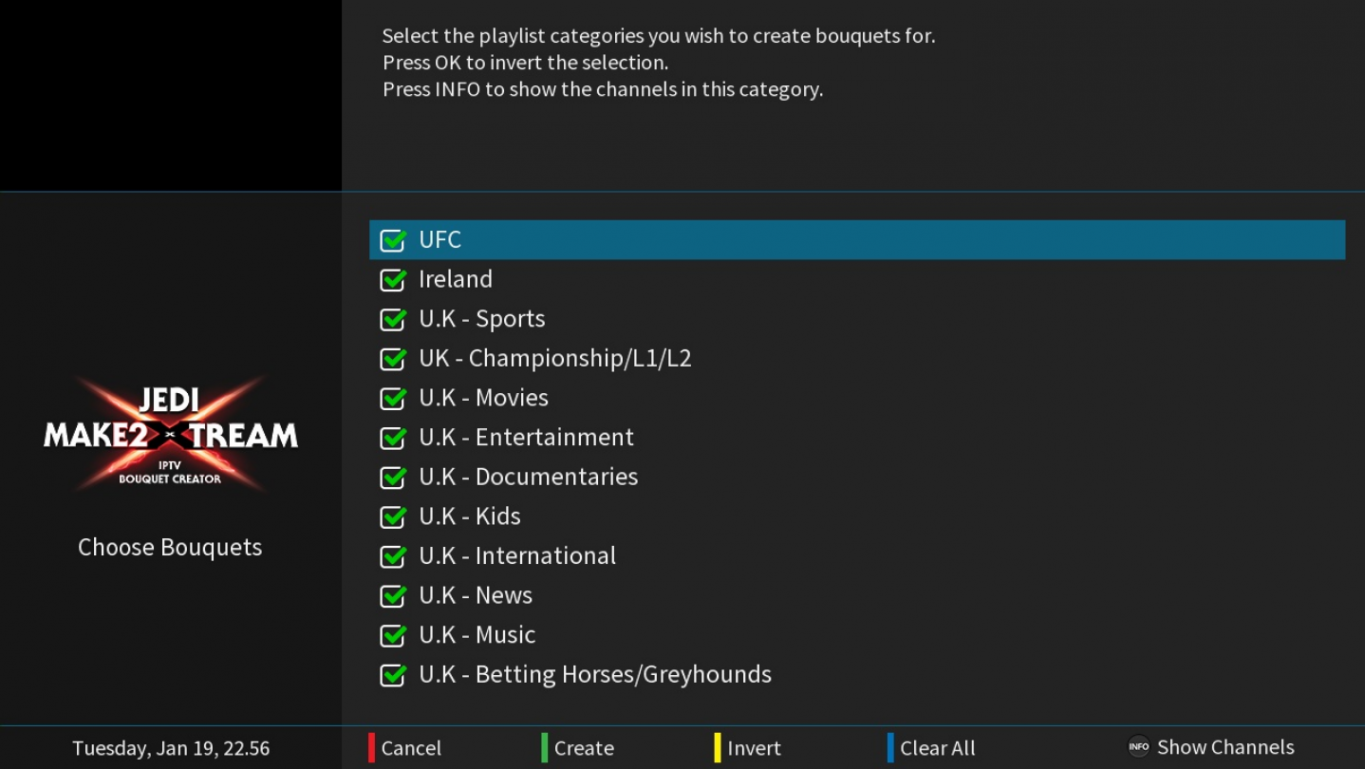
7-Ok, the categories which are assign to our IPTV account are loaded now. You can choose which one do you want to keep in your IPTV bouquet. You can check/uncheck them by pressing the OK button on the remote. You can see the channels inside each category by click on Info/Text button on the remote.
Once ready, click the Green button and proceed.
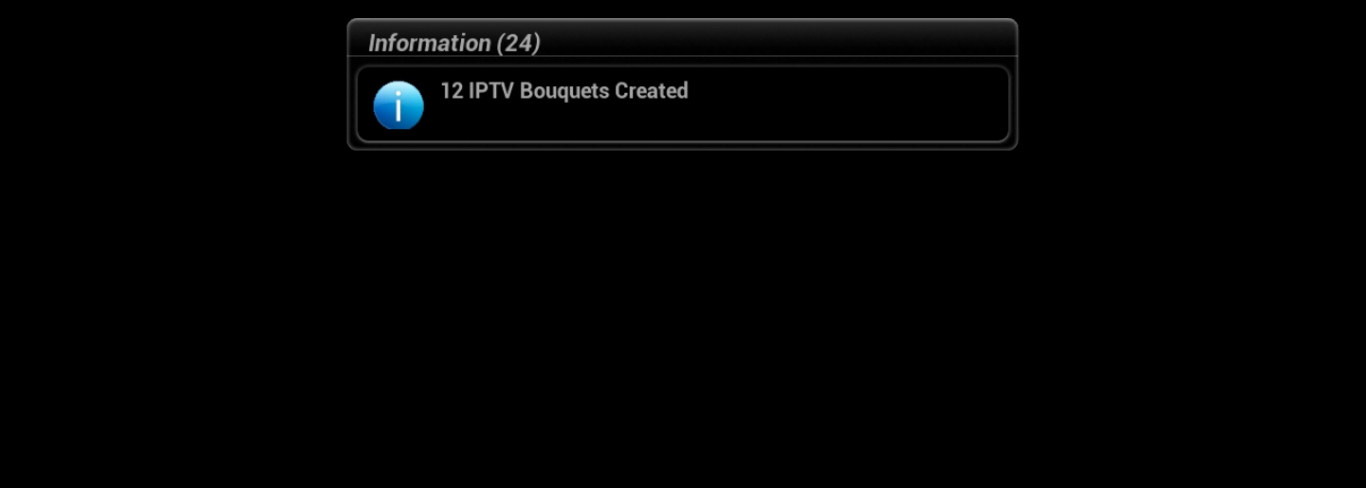
8-First a Downloading and then a confirmation message of Bouquet Creation should pop up.
9-Almost done. Our IPTV account for this tutorial had LiveTV for UK channels assigned, no VOD. That's why you see the plugin could pull data for LiveTV and nothing for VOD or series.
Now exit the plugin by clicking on the Exit button on your remote.
10-We are done! Simply bring up the Favorite list on your channel listing and you should see the IPTV Bouquet we have made with all categories beautifully listed. Get inside your desired category, and run the stream you want.
